Choices
<todo>
  <h3>{ opts.title }</h3>

  <ul>
    <li each="{ item, i in items }">{ item }</li>
  </ul>

  <form onsubmit="{ add }">
    <input>
    <button>Add #{ items.length + 1 }</button>
  </form>

  <style scoped>
    h3 { font-size: 14px; }
  </style>

  <script>
    this.items = []

    add(e) {
      var input = e.target[0]
      this.items.push(input.value)
      input.value = ''
    }
  </script>
</todo>
A custom tag glues relevant HTML and JavaScript together forming a reusable component.
Think React + Polymer but with enjoyable syntax and a small learning curve.
Custom tags let you build complex views with HTML
<body>

  <h1>Acme community</h1>

  <forum-header/>

  <forum-content>
    <forum-threads/>
    <forum-sidebar/>
  </forum-content>

  <forum-footer/>

  <script>riot.mount('*', { api: forum_api })</script>
</body>Absolutely the smallest possible amount of DOM updates and reflows
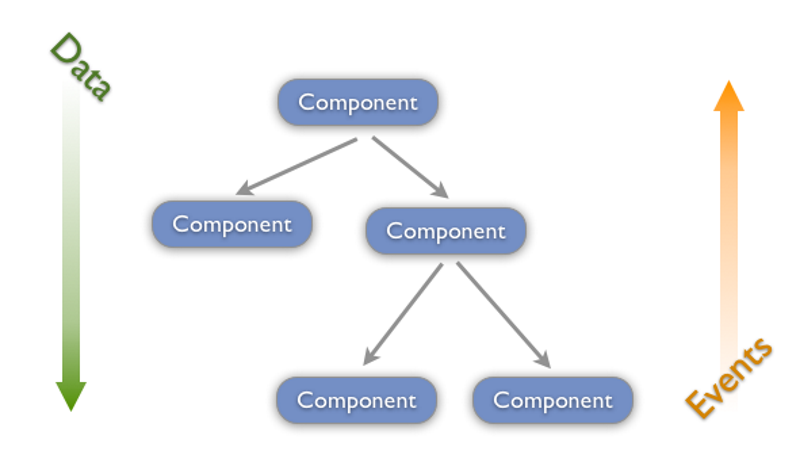
One way data flow: updates and unmounts are propagated downwards from parent to children
Expressions are pre-compiled and cached for high performance
Life-cycle events for more control
Server-side rendering of custom tags for universal (isomorphic) applications
No proprietary event system
The rendered DOM can be freely manipulated with other tools
No extra HTML root elements or data- attributes
Plays well with jQuery
Create tags with ES6, Typescript, CoffeeScript, Jade, LiveScript or any pre-processor you want
Integrate with NPM, CommonJS, AMD, Bower...
Develop with Gulp, Grunt, Browserify, WebPack...
Riot has fewer API methods than other UI libraries.
Less to learn. Fewer books and tutorials to view
Less proprietary stuff and more standard stuff
| Framework | Version | Minified Size |
|---|---|---|
| Ember | 1.13.3 | 493.3kb |
| Angular | 1.4.2 | 145.5kb |
| React | 0.14.1 | 132.6kb |
| Web Components Polyfill | 0.7.5 | 117.1kb |
| Polymer | 1.0.6 | 101.2kb |
| Riot | 2.3.12 | 20kb |
<todo>
  <h3>{ opts.title }</h3>

  <ul>
    <li each="{ item, i in items }">{ item }</li>
  </ul>

  <form onsubmit="{ add }">
    <input>
    <button>Add #{ items.length + 1 }</button>
  </form>

  <style scoped>
    h3 { font-size: 14px; }
  </style>

  <script>
    this.items = []

    add(e) {
      var input = e.target[0]
      this.items.push(input.value)
      input.value = ''
    }
  </script>
</todo><html>
<head>
<title>Hello Riot</title>
</head>
<body>
<todo></todo>
<script src="todo.tag" type="riot/tag"></script>
<script src="js/riot+compiler.min.js"></script>
<script>riot.mount('todo')</script>
</body>
</html>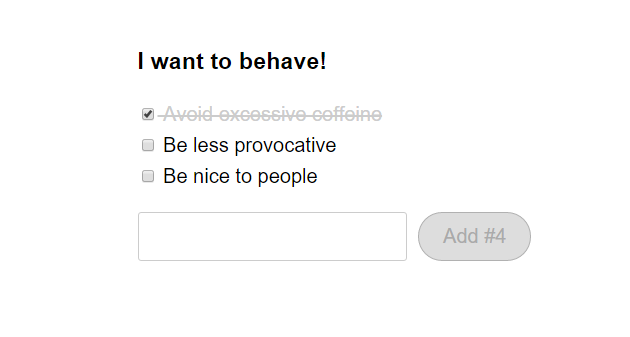
Custom tags need to be transformed to JavaScript so the browser can execute them.
Do this by setting a type="riot/tag" attribute for script tags.
There's also a command line compiler
riot.tag2(
  'todo',
  '<h3>{opts.title}</h3> ...',
  'todo h3,[riot-tag="todo"] h3 { font-size: 14px; }',
  '',
  function(opts) {
    this.items = []

    this.add = function(e) {
      var input = e.target[0]
      this.items.push(input.value)
      input.value = ''
    }.bind(this)
  },
'{ }');Compilation phase takes very little time
Compiling the todo tag 30 times takes 2 milliseconds on a regular
laptop.
1000 different todo-sized tags, the compilation takes around 35ms
The compiler weighs only 3.2KB (1.7K gzipped)
![]()


var Timer = React.createClass({
  getInitialState: function() {
    return {secondsElapsed: 0};
  },
  tick: function() {
    this.setState({secondsElapsed: this.state.secondsElapsed + 1});
  },
  componentDidMount: function() {
    this.interval = setInterval(this.tick, 1000);
  },
  componentWillUnmount: function() {
    clearInterval(this.interval);
  },
  render: function() {
    return (
      <div>Seconds Elapsed: {this.state.secondsElapsed}</div>
    );
  }
});

ReactDOM.render(<Timer />, mountNode);<timer>
<p>Seconds Elapsed: { time }</p>
<script>
this.time = opts.start || 0
tick() {
this.update({ time: ++this.time })
}
var timer = setInterval(this.tick, 1000)
this.on('unmount', function() {
clearInterval(timer)
})
</script>
</timer>
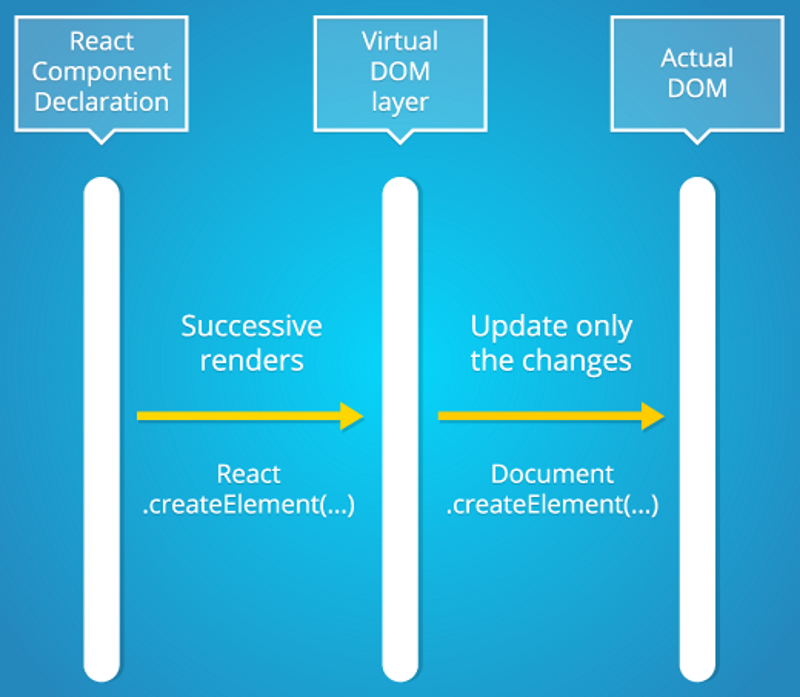
Render views straight-up
Use a DOM abstraction
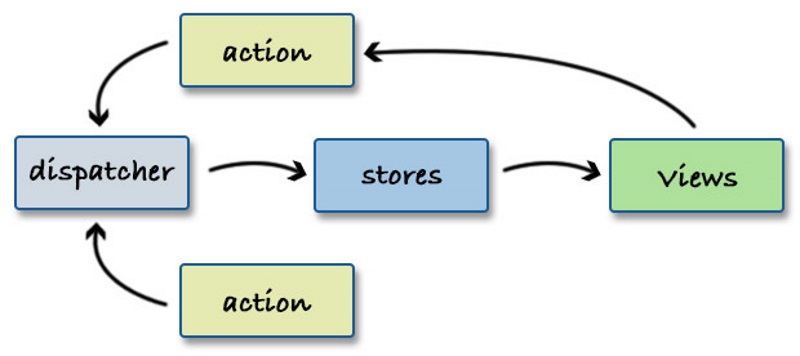
Data flows in one direction
Components rule
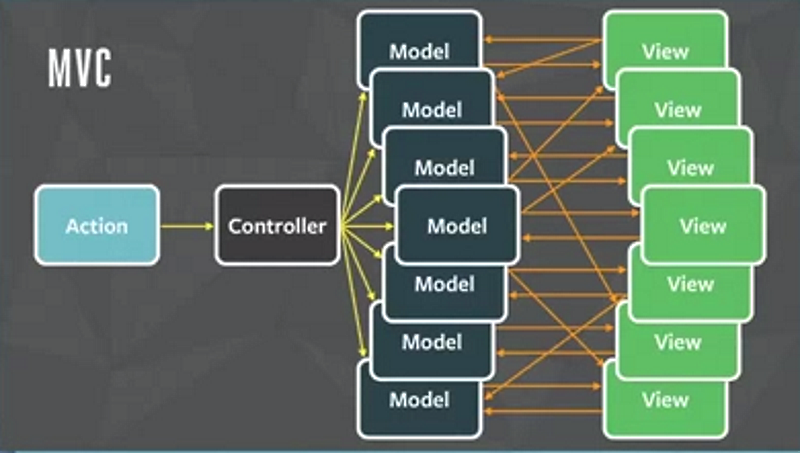
The most significant difference lies in how the UI markup templates are declared:
In React the UI template markup is baked in your JavaScript source (using the JSX language extension)
Riot inverts the React model by putting the markup and logic in an HTML (tag) file


A Riot tag is a combination of layout (HTML) and logic (JavaScript). Here are the basic rules:
HTML is defined first and the logic is enclosed inside an optional
<script> tag
Custom tags can be empty, HTML only or JavaScript only
Attribute names must be lowercase
A shorthand syntax for class names is available:
class={ completed: done }
renders to class="completed" when the value of done is a true
value
You can put a style tag inside. Riot.js automatically takes it out and
injects it into <head>
<todo>

  <!-- layout -->
  <h3>{ opts.title }</h3>

  <style>
    todo { display: block }
    todo h3 { font-size: 120% }
    /** other tag specific styles **/
  </style>

</todo>
Scoped CSS is also available.
<todo>

  <!-- layout -->
  <h3>{ opts.title }</h3>

  <style scoped>
    :scope { display: block }
    h3 { font-size: 120% }
    /** other tag specific styles **/
  </style>

</todo>You can specify a pre-processor with type attribute
<my-tag>
  <script type="coffee">
    # your coffeescript logic goes here
  </script>
</my-tag>
Other options: “coffee”, “typescript”, “es6” and “none”
Once a tag is defined you can mount it on the page as follows:
<body>

  <!-- place the custom tag anywhere inside the body -->
  <todo></todo>

  <!-- include riot.js -->
  <script src="riot.min.js"></script>

  <!-- include the tag -->
  <script src="todo.js" type="riot/tag"></script>

  <!-- mount the tag -->
  <script>riot.mount('todo')</script>

</body>// mount all custom tags on the page
riot.mount('*')
// mount an element with a specific id
riot.mount('#my-element')
// mount selected elements
riot.mount('todo, forum, comments')Adds Observer support for the given object el
function Car() {

  // Make Car instances observable
  riot.observable(this)

  // listen to 'start' event
  this.on('start', function() {
    // engine started
  })
}

// make a new Car instance
var car = new Car()

// trigger 'start' event
car.trigger('start')Custom tags are instances of riot.observable
this.on('before-mount', function() {
  // before the tag is mounted
})
this.on('mount', function() {
  // right after the tag is mounted on the page
})
this.on('update', function() {
  // allows recalculation of context data before the update
})
this.on('updated', function() {
  // right after the tag template is updated
})
this.on('before-unmount', function() {
  // before the tag is removed
})
this.on('unmount', function() {
  // when the tag is removed from the page
})
// curious about all events ?
this.on('all', function(eventName) {
  console.info(eventName)
})<example-tag>
<p id="findMe">Do I even Exist?</p>
<script>
var test1 = document.getElementById('findMe')
console.log('test1', test1) // Fails
this.on('update', function(){
var test2 = document.getElementById('findMe')
console.log('test2', test2) // Succeeds, fires on every update
})
this.on('mount', function(){
var test3 = document.getElementById('findMe')
console.log('test3', test3) // Succeeds, fires once (per mount)
})
</script>
</example-tag><script>
riot.mount('todo', { title: 'My TODO app', items: [ ... ] })
</script>Inside the tag the options can be referenced with opts
<my-tag>

  <!-- Options in HTML -->
  <h3>{ opts.title }</h3>

  // Options in JavaScript
  var title = opts.title

</my-tag>HTML can be mixed with expressions that are enclosed in curly braces
{ /* my_expression goes here */ }Expressions can set attributes or nested text nodes
<h3 id={ /* attribute_expression */ }>
  { /* nested_expression */ }
</h3>
Expressions are 100% JavaScript
{ title || 'Untitled' }
{ results ? 'ready' : 'loading' }
{ new Date() }
{ message.length > 140 && 'Message is too long' }
{ Math.round(rating) }
Boolean attributes (checked, selected etc..) are ignored when the expression value is falsy
<input checked={ null }> becomes <input>.W3C states a boolean property is true if the attribute is present
The following expression does not work
<input type="checkbox" { true ? 'checked' : ''}>Riot has a special syntax for CSS class names
<p class={ foo: true, bar: 0, baz: new Date(), zorro: 'a value' }>
</p>
Property names with truthy values are appended to class names
The inclusion of part of one hypertext document in another one by means of reference rather than copying
<my-tag>
  <p>Hello <yield/></p>
  this.text = 'world'
</my-tag>
Usage
<my-tag>
  <b>{ text }</b>
</my-tag>
Result
<my-tag>
  <p>Hello <b>world</b><p>
</my-tag>The <yield> tag also provides a slot mechanism that allows you to
inject html contents on specific slots in the template
For example using the following riot tag my-other-post
<my-other-post>
  <article>
    <h1>{ opts.title }</h1>
    <h2><yield from="summary"/></h2>
    <div>
      <yield from="content"/>
    </div>
  </article>
</my-other-post><my-other-post title="What a great title">
<yield to="summary">
My beautiful post is just awesome
</yield>
<yield to="content">
<p>And the next paragraph describes just how awesome it is</p>
<p>Very</p>
</yield>
</my-other-post>Result:
<article>
  <h1>What a great title</h1>
  <h2>My beautiful post is just awesome</h2>
  </div>
    <p>And the next paragraph describes just how awesome it is</p>
    <p>Very</p>
  </div>
</article><todo>
<ul>
<li each={ items } class={ completed: done }>
<input type="checkbox" checked={ done }> { title }
</li>
</ul>
this.items = [
{ title: 'First item', done: true },
{ title: 'Second item' },
{ title: 'Third item' }
]
</todo>Element with the each attribute repeated for all items in array
The array elements need not be objects. They can be strings or numbers
as well. Use the { name, i in items }
<my-tag>
  <p each="{ name, i in arr }">{ i }: { name }</p>

  this.arr = [ true, 110, Math.random(), 'fourth']
</my-tag><my-tag>
<p each="{ name, value in obj }">{ name } = { value }</p>
this.obj = {
key1: 'value1',
key2: 1110.8900,
key3: Math.random()
}
</my-tag>Object loops are not recommended
Observable
Routing
But first ...

https://github.com/mike-ward/talk-riotjs
Router (Riot Control)
Flux (no library)
Tooling (Webpack and NPM)
My lame attempt at an iTunes browser
https://github.com/mike-ward/electron-riot
Cross platform desktop apps with web technologies
Yet another lame attempt at an iTunes browser